Overview
Lead Navigator is a client-acquisition workspace in FlexiFunnels for agencies, freelancers, marketers, and service providers. It helps you find qualified business leads, manage prospects, discover freelance opportunities, create personalized outreach messages with AI, and organize your workflow using filters and automation.
- Find high-quality business leads.
- Manage and track leads in one place.
- Discover relevant freelance jobs from multiple platforms.
- Generate personalized outreach messages using AI.
- Save time with automation and smart filters.
Before You Begin
- Confirm that you can sign in to your FlexiFunnels account.
- Ensure that Lead Navigator is available in the Apps section of your dashboard.
- Prepare the keywords, locations, industries, or job types you want to search.
Video Tutorials
Job Agent
Lead Engine
Lead Manager
Outreach Message Agent
Step 1: Open Lead Navigator
Open the Apps section from your FlexiFunnels dashboard. The Apps area contains the tools available for your account.
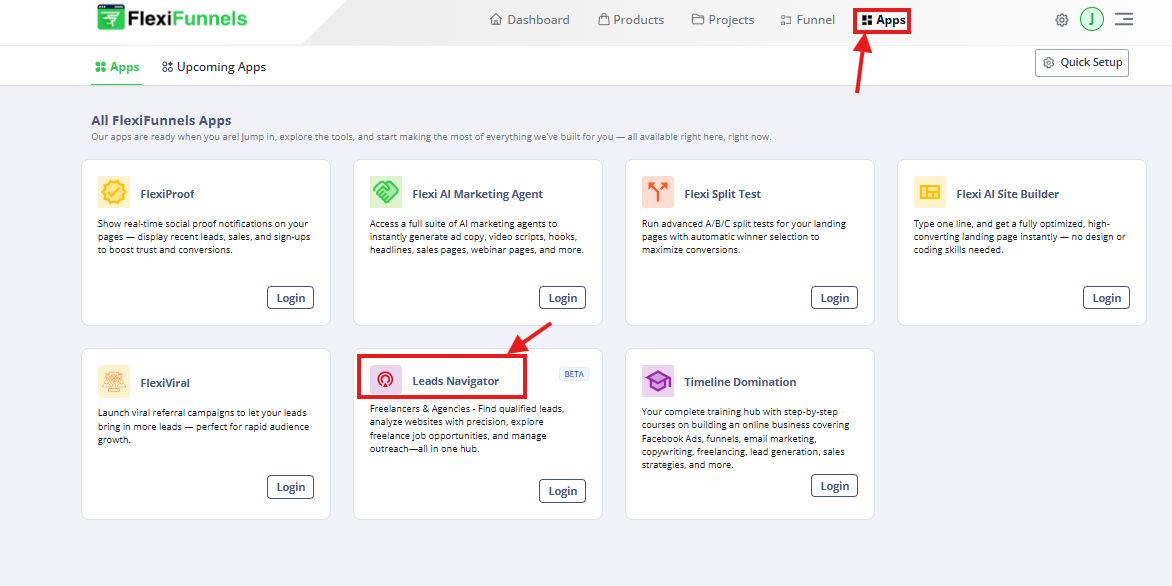
Step 2: Select Lead Navigator
Click Lead Navigator. After the app opens, use the left navigation menu to access the dashboard, lead search, lead management, job search, outreach, credits, and bonus resources.
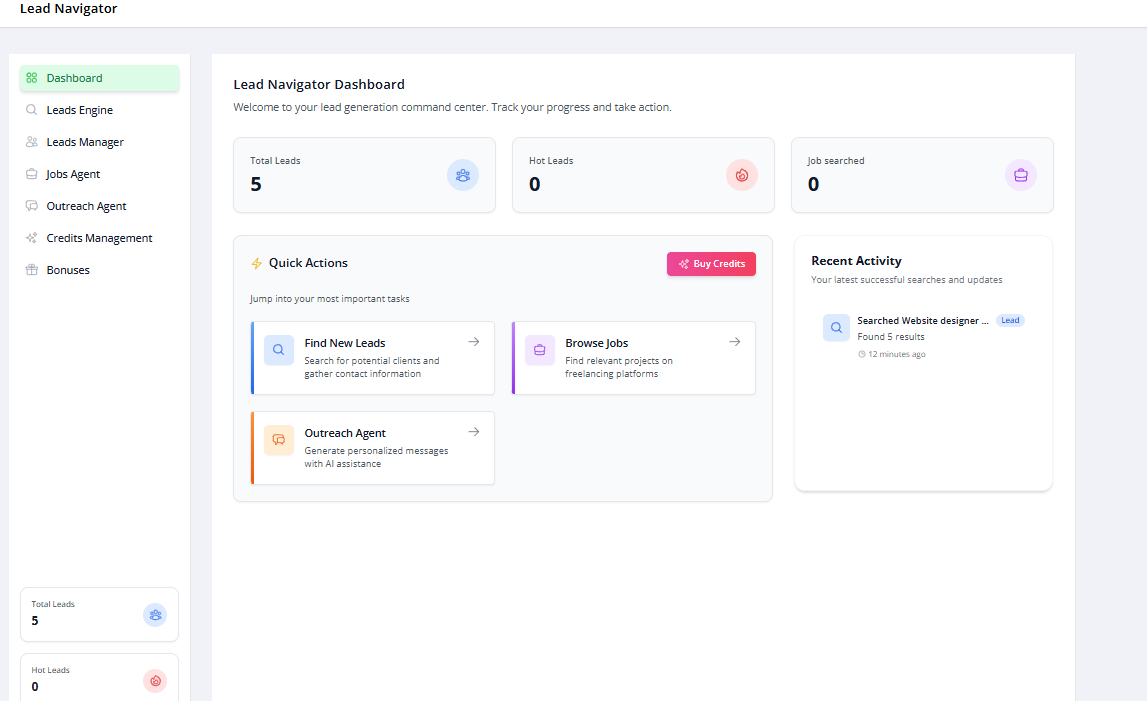
Lead Navigator Sections
1. Dashboard
The Dashboard is the central view of your Lead Navigator activity. It provides a quick summary of your work and shortcuts to commonly used actions.
- Total leads.
- Hot leads.
- Jobs searched.
- Recent activity.
- Quick actions such as Find Leads and Browse Jobs.
Use case: Review daily progress, monitor searches, and start lead-generation tasks quickly.
2. Leads Engine
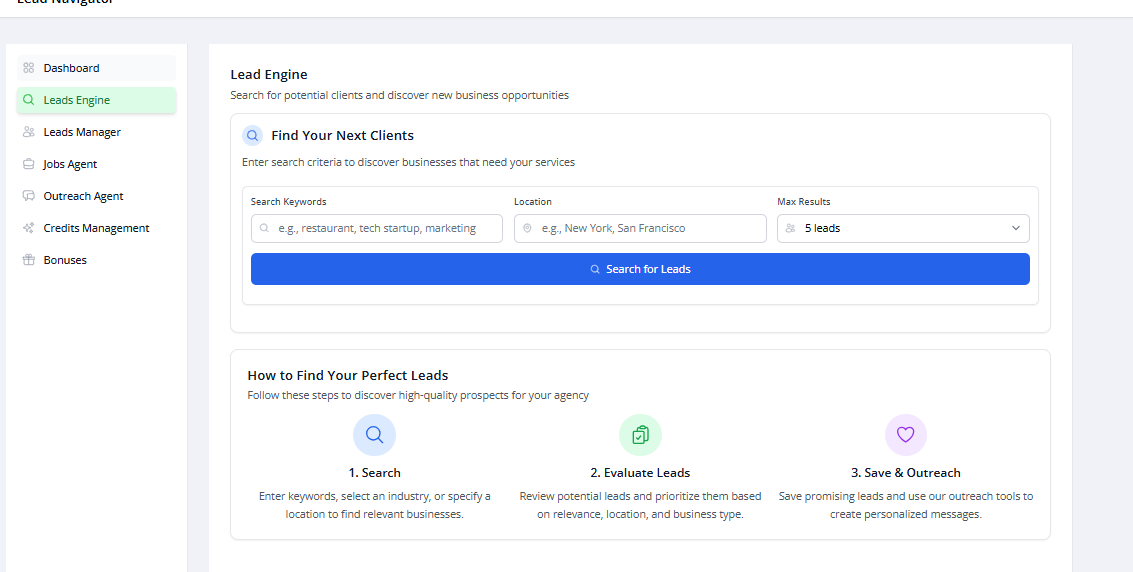
Leads Engine searches for potential clients based on your niche, location, and business type. It is useful for agencies, freelancers, and local service providers who need a consistent source of new prospects.
Enter the following search criteria:
- Keyword: Enter a business type or industry, such as restaurant, tech startup, or marketing agency.
- Location: Enter a city or region, such as New York, Mumbai, or San Francisco.
- Maximum results: Select the number of leads to retrieve, such as 5, 10, or 20.
Click Search for Leads. Results generally appear within 60–80 seconds in the Dashboard and Leads Manager.
Step 3: Review and Select Leads
Use the search results to evaluate which businesses are a good match for your services.
- Company name.
- Website.
- Contact details.
- Location.
- Business type.
- Lead score as an indication of lead quality.
Select leads that match your target customer profile and service offering.
3. Leads Manager
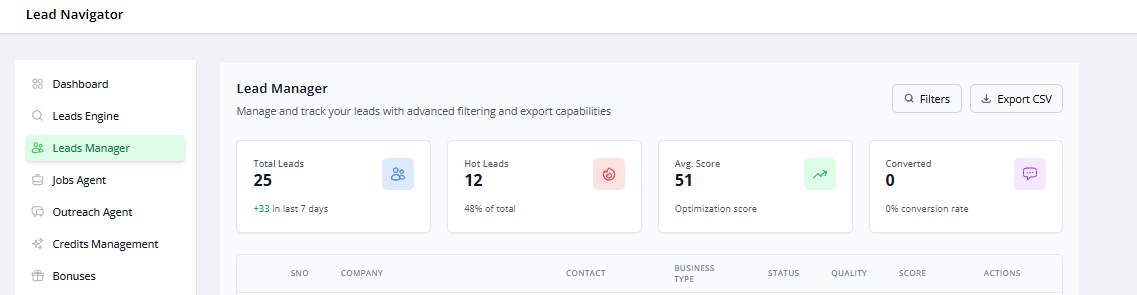
Leads Manager is a CRM-style workspace for organizing and tracking saved or searched leads.
- Total leads.
- Hot leads.
- Quality score.
- Conversion score.
- Filters for sorting high-value leads.
- Options to save, delete, or create outreach messages.
Use case: Manage the client pipeline, organize lead data, and prepare prospects for outreach.
4. Job Agent
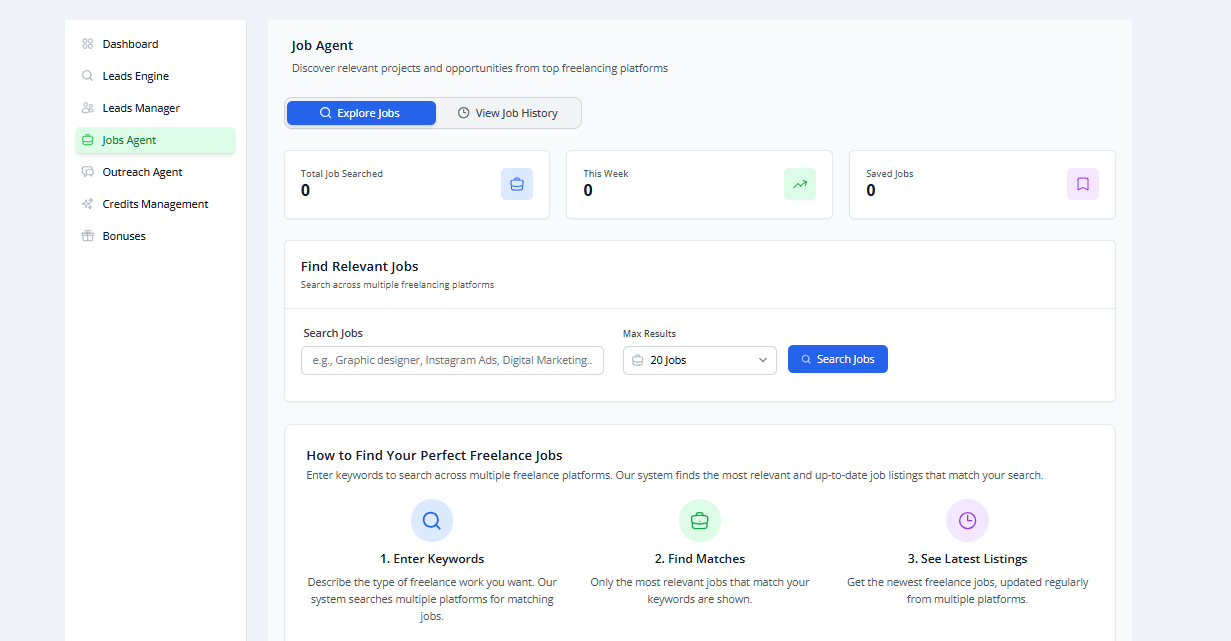
Job Agent searches multiple freelancing platforms for job listings that match your skills and preferences.
Use case: Find relevant, current projects when you are looking for freelance work.
How Job Agent Works
Step 1: Enter Keywords
Enter the service or skill you want to search for, such as “Graphic designer,” “Facebook ads expert,” or “Web developer.”
Step 2: Find Matches
Job Agent collects and displays listings that match your search terms.
Step 3: Review the Latest Listings
Review recently updated jobs from multiple platforms and select the number of results you want to display, such as 10, 20, or 30 jobs.
5. Outreach Agent
Outreach Agent uses AI to create personalized messages for selected leads.
Use case: Create outreach for cold emails, LinkedIn messages, WhatsApp business messages, and Instagram direct messages.
Select a lead in Leads Manager and generate a message based on the lead's business information.
- Email outreach scripts.
- LinkedIn connection messages.
- WhatsApp business messages.
- Instagram outreach messages.
The generated message is tailored to the selected business details, reducing the time required to write each message.

6. Credits Management
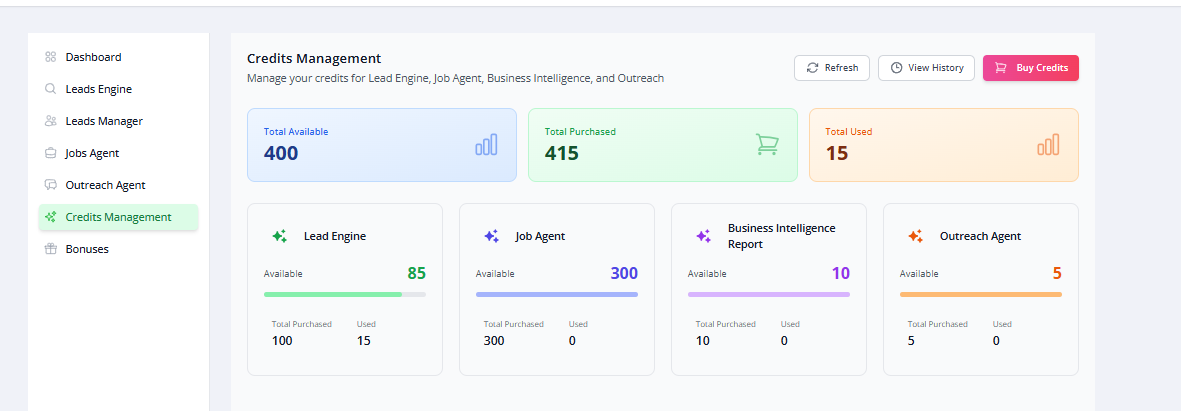
Credits Management shows the credits available for Lead Navigator tools, including:
- Leads Engine.
- Job Agent.
- Business Intelligence.
- Outreach Agent.
Use case: Monitor your credit balance and top up when required for additional searches or actions.
7. Bonuses
The Bonuses section contains plan-specific training, templates, and resources.
Use case: Use the available resources to improve lead generation, sales outreach, client acquisition, and agency growth.

Step 4: Generate an Outreach Message
Open Leads Manager and select the lead for which you want to create an outreach message.
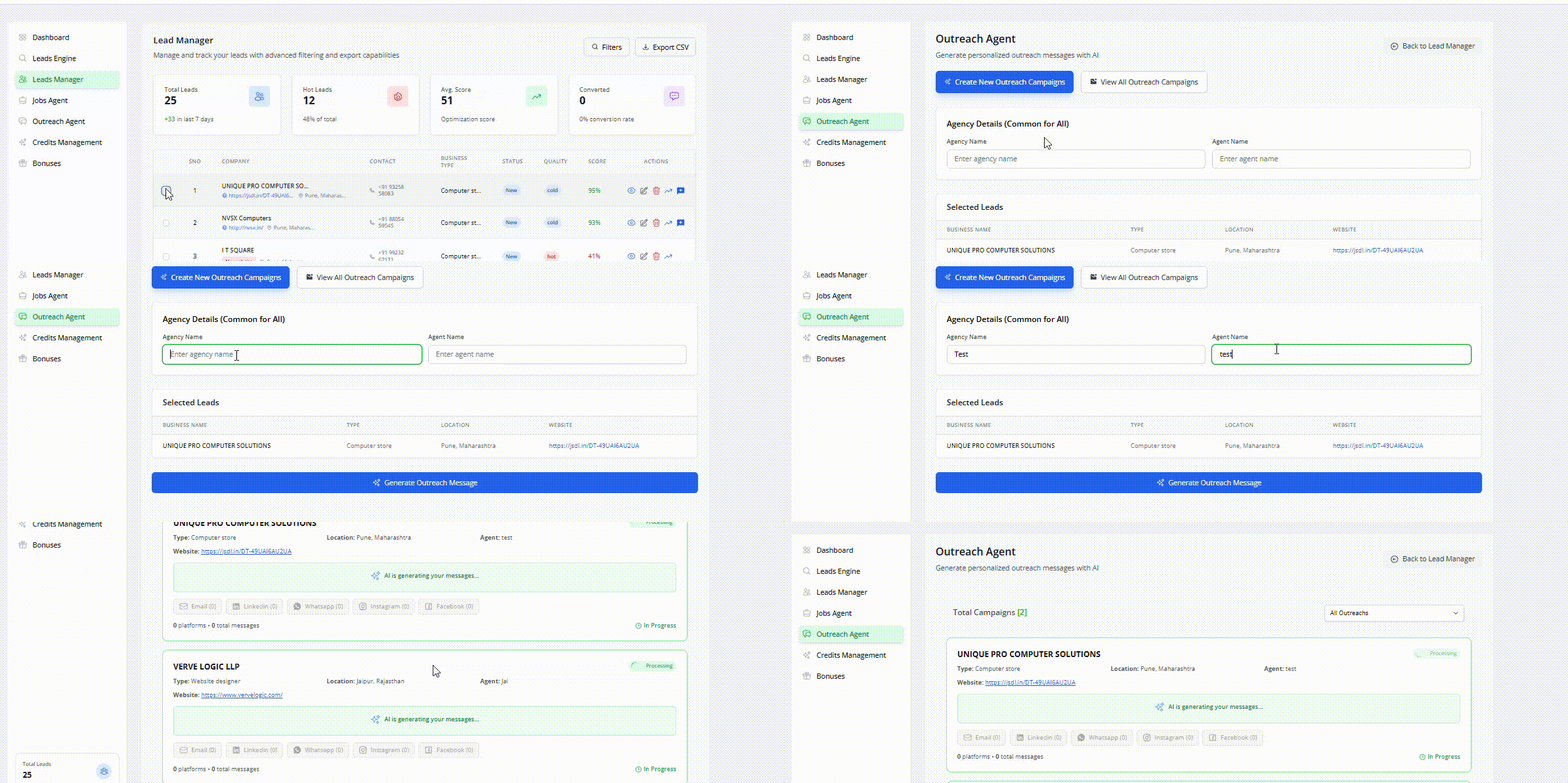
After selecting the lead, choose the channel for the message:
- Email.
- LinkedIn.
- WhatsApp.
- Instagram.
Lead Navigator generates a personalized message using the selected business details.
Complete Workflow Summary
- Open Apps and select Lead Navigator.
- Use Leads Engine to search for businesses.
- Wait approximately 60–80 seconds for the results.
- Open Leads Manager to review and save leads.
- Use Outreach Agent to generate AI-powered messages.
- Use Job Agent to find relevant freelance jobs when needed.
- Monitor credits and access additional resources in the Bonuses section.
Verify the Configuration
Confirm that Lead Navigator opens from the Apps section and that its navigation menu displays the expected tools. Run a test search, wait for the results, confirm that leads appear in Leads Manager, and generate an outreach message for one selected lead.
Common Scenarios
- Agency lead generation: Search for businesses that match a client's target market.
- Freelance prospecting: Find businesses and create personalized outreach for new projects.
- Job discovery: Search multiple platforms for freelance opportunities.
- Pipeline management: Save, filter, and prioritize leads in Leads Manager.
- Multi-channel outreach: Generate messages for email, LinkedIn, WhatsApp, or Instagram.
Best Practices
- Use specific keywords and locations to improve search relevance.
- Define your ideal customer profile before searching.
- Review lead quality before beginning outreach.
- Use filters to prioritize high-value or high-conversion leads.
- Personalize AI-generated messages before sending them.
- Monitor credits before running large searches.
- Allow 60–80 seconds for lead results to populate.
- Keep your lead records organized in Leads Manager.
Before Contacting Support
- Confirm that Lead Navigator is available under Apps.
- Verify that your search keywords and location are valid.
- Wait 60–80 seconds for the search results to load.
- Check your available credits.
- Refresh Leads Manager and review the lead list again.
- Confirm that a lead is selected before generating an outreach message.
Expected Outcome
Lead Navigator provides a centralized workflow for finding business leads, discovering freelance jobs, managing prospects, and creating personalized outreach. You can search for relevant opportunities, organize the results, and use AI-assisted messaging to support your client-acquisition process.
Related Articles
- Using the FlexiFunnels Apps Section
- Managing Leads in FlexiFunnels
- Creating AI-Powered Outreach Messages
Was this article helpful?
That’s Great!
Thank you for your feedback
Sorry! We couldn't be helpful
Thank you for your feedback
Feedback sent
We appreciate your effort and will try to fix the article